This tutorial guides you through the process of installing Tomcat 8.5 with private instances.
All the instructions provided assume that you are logged into the server via SSH as the root user or using WHM's Terminal (WHM > Server Configuration > Terminal).
In the examples below, $username represents the username associated with the specific cPanel account.
Syntax: /home/$username/.bashrc
Example: /home/example123/.bashrc
Steps to Install Tomcat:
-
Install the Tomcat RPM:
-
Begin by installing the ea-tomcat85 and rng-tools packages using the following command:
yum install ea-tomcat85 rng-tools -y
-
Add Tomcat Support to an Account:
-
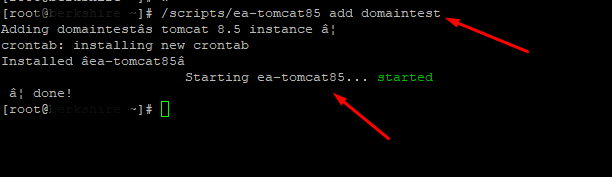
Now, add Tomcat support to the account(s) that need it. Execute the following command for each user requiring Tomcat:
/scripts/ea-tomcat85 add $username
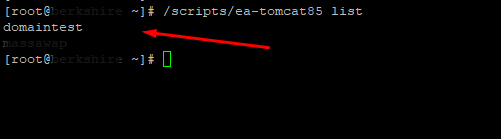
After completing the aforementioned steps, you can verify that Tomcat has been enabled for the accounts.
/scripts/ea-tomcat85 list
Installing Ubic:
-
Installation Process:
The installation of Ubic for any given cPanel user is straightforward and reliable. It requires the cPanel user to have shell access to the server, including write permissions to the users /home/$username/.bashrc file.
Use the following command in the shell/terminal while logged in with root access, replacing $username with the correct username:
su - $username
echo "export PATH=$(dirname $(readlink /usr/local/cpanel/3rdparty/bin/perl)):$PATH" >> /home/$username/.bashrc

a. Considerations for CloudLinux:
If you are using CloudLinux, execute the following commands (from the root level) to add Java to the CageFS mounts:
cagefsctl --addrpm tzdata-java
cagefsctl --force-update
-
Verification/Testing:
-
After installation, confirm that Ubic is running and Tomcat is enabled for the user with the following command (from the root level):
su - $username -s /bin/bash -c 'ubic status ea-tomcat85'

Configuring the Tomcat Environment
Configuring the Tomcat environment is the most intricate aspect of this process. The steps outlined below can be followed to set up the environment correctly. Please note that the ports mentioned below are merely examples, and your specific ports may differ.
-
Configuration of Application Directory:
To enable the ROOT webapp directory for testing, add the following entry to the
-
Environment Verification:
To ensure that the environment is functioning correctly, we recommend copying our test.jsp and attempting to call it directly before making any modifications that may impact Apache's configuration.
You will need to identify the port for testing, which can be obtained using the following command:
egrep 'Connector port.*HTTP' /home/$username/ea-tomcat85/conf/server.xml
To copy the test script, utilize the following command:
sudo -u $username cp -avp /opt/cpanel/ea-tomcat85/test.jsp /home/$username/ea-tomcat85/webapps/ROOT/
After completion, reboot the user's Private Tomcat Instance.
su - $username -s /bin/bash -c 'ubic restart ea-tomcat85'
To verify that test.jsp is operational, access "http://yourserverip:$PORT/test.jsp" using your preferred method, where $PORT is the previously obtained port. You'll view a page showing the following content.
Test JSP Page
This is a page to check that .jsp support has been enabled.
-
Configure ProxyPass:
To properly configure the ProxyPass directive, start by obtaining the AJP connector port. Execute the following command to retrieve the port information:
egrep 'Connector port.*AJP' /home/$username/ea-tomcat85/conf/server.xml

Once you have obtained the port, proceed to create a ProxyPass Apache include file. Remember to perform this action twice, once for http (std) and another for https (ssl). Both follow the same approach as our Apache VHost Includes. The path for http (std) includes:
/etc/apache2/conf.d/userdata/std/2_4/$username/$domain.tld/tomcatproxypass.conf
The content of the file would resemble the following:
Proxypass "/" "ajp://127.0.0.1:$PORT/"
Where $PORT is the port value retrieved from the previous command.
After creating the included files, rebuild the Apache configuration and restart the service with the following commands:
/usr/local/cpanel/scripts/rebuildhttpdconf && /usr/local/cpanel/scripts/restartsrv_httpd
Finally, confirm that the ProxyPass include is functioning by loading "http://yourdomain.tld/test.jsp" in your preferred browser. Similarly, expect the following result as previously mentioned.
Test JSP Page
This page verifies the successful enabling of .jsp support.
Installing Your Site:
If you have reached this point successfully, you are now ready to install your application. Simply copy the application files into /home/$username/ea-tomcat85/webapps/ROOT/, and your application will be accessible at yourdomain.tld/.